- Spedizione gratuita da 75 € all'interno di Italia
- Reso semplice


 Spedizione gratuita da 75 €*
 Spedizione con Poste Italiane
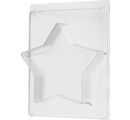
Un grande stampo per colata 'a stella', particolarmente adatto per la colata con calcestruzzo creativo e Raysin. Lo stampo è resistente al calore fino a 60 °C ed è particolarmente stabile e resistente.
Ed ecco come è facile modellare la stella:
Rivestire leggermente lo stampo con olio da cucina prima di procedere.
Non versare il composto di fusione creativa completamente fino al bordo.
Lasci indurire e, se necessario, tenga lo stampo sotto l'acqua corrente fredda e lo batta leggermente su una superficie solida quando lo sforma.
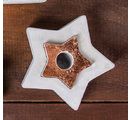
Utilizzi la carta vetrata per levigare eventuali bordi irregolari o taglienti. Ora utilizzi colori artigianali, pennarelli o anche foglie di metallo per dare alla stella quel qualcosa in più e avrà un'ottima opzione decorativa da esporre su un davanzale, una cassettiera o anche su un vassoio. Aggiunga neve decorativa, zuccherini e un filo di luci, oltre ad altri motivi modellati, per creare in poco tempo una grande decorazione invernale.
Requisiti del materiale:
Ø 21,5 cm: max. 3300 g
Ø 28 cm: max. 1700 g
Tips to use:
Preparations:
Mix the desired casting compound according to the instructions. If you wish, you can color it with color pigment powder.
Application:
Slowly pour the mixed casting compound into the casting mould. Leave a rim of at least 2 mm free to make it easier to demould your casting later.
Gently tap the casting mould so that the mixture is evenly distributed and any air bubbles come to the surface. You can then prick these with a lace object.
Time to dry:
Allow the casting compound to harden well. Follow the drying times specified in the instructions for the casting compound.
Work to finish:
You can now demould your casting. If the casting does not come off simply by dropping it, you can carefully loosen the mould all around with your fingers and tap it against the mould.
Good to know:
For detailed moulds, we recommend using a mould release agent or release wax to protect the mould.


